An AirTag is a nifty little device created by Apple to help you keep track of your important items like keys, bags, or anything else you might want to locate easily.
As you initialize your AirTag, it automatically establishes a connection with your Apple ID, ensuring its exclusive association. If circumstances require you to transfer ownership or connect it to a different Apple ID, the solution lies in a straightforward reset.
Resetting your AirTag allows you to wipe its existing connections and configurations. Whether you’re handing it over to someone else or connecting it to a different Apple ID, a reset ensures a clean slate for your AirTag’s journey.
What is an AirTag?
An AirTag is a small, coin-shaped gadget that uses Bluetooth technology to connect with your Apple devices, like your iPhone or iPad. Its primary purpose is to help you find things you might misplace or forget. It is in form of a digital companion for your belongings.
How Does AirTag Work?
When you attach an AirTag to an item, it communicates with your Apple devices through Bluetooth. This allows you to track the location of the tagged item using the “Find My” app on your iPhone. The app shows you the approximate location of your item on a map, making it easier for you to retrieve it.
Key Features of AirTag:
1. Precision Tracking: AirTag provides precise location tracking, making it easier to pinpoint your lost items accurately.
2. Play Sound Feature: If your item is nearby but out of sight, you can use the “Play Sound” feature in the app, causing the AirTag to emit a sound, helping you locate it.
3. Lost Mode: If you can’t find your item, you can activate Lost Mode through the “Find My” app. This notifies you when your item’s location is identified by other Apple devices in the vicinity, maintaining your privacy.
4. Privacy and Security: AirTag is designed with privacy in mind. It does not store your location data, and the tracking information is encrypted to ensure secure usage.
Simple Guide on How to Reset AirTag
Resetting your AirTag is a quick and straightforward process. Whether you want to use it with a new device or troubleshoot any issues, here’s a step-by-step guide to help you reset your AirTag:
Step 1: Open the Find My App
Initiate the process by opening the “Find My” app on your Apple device. If you don’t have it installed, you can download it from the App Store.
Step 2: Locate Your AirTag
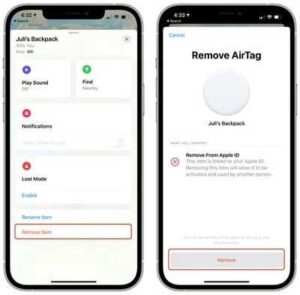
In the “Find My” app, select the “Items” tab at the bottom of the screen. Look for your AirTag in the list of connected devices.
Step 3: Access AirTag Settings
Tap on your AirTag’s name to access its settings. This will open a new window with detailed information about your AirTag.
Step 4: Choose “Remove Item”
Scroll down to the bottom of the AirTag settings page. You’ll find an option labeled “Remove Item.” Tap on this option to initiate the reset process.

Step 5: Confirm Reset
A confirmation prompt will appear, asking if you’re sure you want to remove the AirTag from your account. Confirm your decision to proceed with the reset.
Step 6: Reset Complete
Once confirmed, your AirTag will be successfully reset. You can now set it up with a new device or troubleshoot any connectivity issues you may have encountered.
Additional Suggestions:
Update Firmware: After resetting, ensure your AirTag has the latest firmware by checking for updates in the “Find My” app.
Check Battery: If you experience connectivity problems after the reset, make sure the AirTag’s battery is not depleted. Consider replacing it with a new one.
Reconnect Smoothly: When setting up your AirTag on a new device, ensure Bluetooth is enabled, and the device is in close proximity for a seamless connection.
How to Factory Reset an AirTag
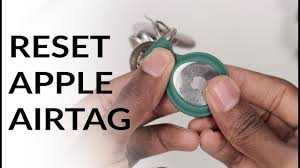
If you ever find yourself needing to reset your AirTag, especially when it’s not in Bluetooth range, you can do it manually with these easy steps:
1. Press and Rotate:
- Press down on the stainless steel back of the AirTag.
- While pressing, rotate counterclockwise until the cover stops moving.
2. Separate the Halves:
- Pull apart the two halves of the AirTag.
3. Remove the Battery:
- Take out the battery from the AirTag.
4. Insert the Battery Back:
- Put the battery back into the AirTag.
5. Press Down on the Battery:
- Press down on the battery until it makes a sound.
- Repeat this process four more times – remove and replace the battery, then press on it until you hear a sound.
6. Ensure Five Sounds:
- You need to hear a total of five sounds to ensure the AirTag is fully reset.
7. Reassemble the AirTag:
- After the reset, put the cover back on the AirTag.
- Align the three tabs on the cover with the three slots on the AirTag.

8. Lock the Cover:
- Press down on the cover until you hear a sound.
- Rotate the cover clockwise until it locks in place.
How to Connect AirTag: A Simple and Helpful Guide
Connecting your AirTag may look slightly strict but we’re here to guide you through the process step by step:
Step 1: Unbox Your AirTag
Unboxing your AirTag. Take a moment to familiarize yourself with the device and ensure all components are present.
Step 2: Power On Your AirTag
Press the small button on the AirTag to turn it on. You’ll hear a sound, indicating that the AirTag is ready to be connected.
Step 3: Unlock Your iPhone
Unlock your iPhone and ensure that Bluetooth is turned on. Proximity to your AirTag is essential for a successful connection.
Step 4: Bring Your AirTag Close to Your iPhone
Hold your AirTag close to your iPhone. The devices should recognize each other, initiating the connection process.
Step 5: Follow On-Screen Instructions
Your iPhone will display on-screen instructions to guide you through the connection. Follow these prompts to link your AirTag to your device.
Step 6: Personalize Your AirTag
Once connected, you’ll have the option to personalize your AirTag. Give it a name and assign it to a specific item or category, making it easily identifiable in your Apple ecosystem.
Step 7: Test the Connection
Ensure that your AirTag is successfully connected by testing its functionality. Use the “Find My” app to check if your iPhone locates the AirTag when prompted.
Tips for a Smooth Connection:
Update Software: Before connecting your AirTag, ensure that both your iPhone and AirTag have the latest software updates.
Check Bluetooth and Location Services: Confirm that Bluetooth and location services are enabled on your iPhone for a seamless connection experience.
Personalize for Easy Identification: Take advantage of the personalization options to easily identify your AirTag among multiple devices.
Test in Different Locations: Test your AirTag in various environments to ensure consistent connectivity wherever you go.

