Easy steps | How to Save Contact Group in Outlook
When it comes to organizing your contacts and streamlining your email communication, Microsoft Outlook stands out as a go-to platform. Within Outlook, you have the capability to create and save group contacts, making it effortless to send messages to multiple recipients simultaneously. Whether you’re coordinating with project team members, collaborating with colleagues, or communicating with friends, saving group contacts in Outlook can significantly enhance your email experience.
Step-by-step How to save contact group in Outlook
Outlook provides a user-friendly solution for creating and saving group contacts. If you find yourself frequently emailing the same set of people, creating a group contact can save you time and effort. Here’s a detailed guide on how to do it:

- Open Outlook:
- Start by launching Microsoft Outlook on your computer. If you don’t have it installed, download and set it up before proceeding.
- Navigate to Contacts:
- Locate and click on the “People” icon situated in the lower-left corner of the Outlook window. This will take you to the Contacts section.
- Create a New Contact:
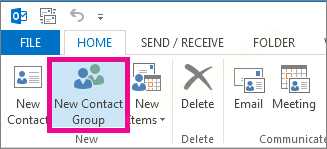
- Now, depending on your version of Outlook, you’ll either see a “New Contact Group” or “New Contact” button. Click on the one that aligns with your goal of creating a group contact.
- Enter Group Details:
- In the contact group window, assign a name to your group in the “Name” field. This name will help you easily identify and select the group in the future.
- Add Members to the Group:
- Click on “Add Members” and choose “From Outlook Contacts” or “From Address Book,” depending on your preference.
- Select the contacts you want to include in the group, then click “Members” or “Add.”
- Save the Group:
- After adding all desired contacts, click “Save & Close” or an equivalent option to save your group contact.
- Verify the Group:
- To confirm that your group is successfully saved, go back to the Contacts section in Outlook and locate the newly created group.
How to Schedule an Email in Outlook: A Simple Guide
Scheduling emails in Outlook allowing you to send messages at the perfect time without manual intervention. Here’s a step-by-step guide to help you schedule your emails:
Step 1: Open Outlook
Open Outlook and create a new email by clicking on “New Email” or press Ctrl + N
Step 2: Compose Your Email
Compose the email you want to send later. Include the recipient’s email address, subject, and the content of your message. Learn how to change Email signature in Outlook.
Step 3: Navigate to the “Options” Tab
Look for the “Options” tab at the top of the email composition window. It’s usually located alongside the “Format Text” and “Review” tabs.
Step 4: Find the “Delay Delivery” Option
Within the “Options” tab, you’ll find a feature called “Delay Delivery” or “Do not deliver before.” Click on this option to access the scheduling settings.
Step 5: Set the Date and Time
A new window will appear where you can set the date and time for your email to be sent. Choose your preferred date and time, keeping in mind your recipient’s time zone if necessary.
Step 6: Confirm and Send
Once you’ve selected the desired date and time, click “Close” or “OK” to confirm your scheduling settings. Learn how to remove Microsoft account from Window 10/11
Step 7: Finish and Send
Complete the email as usual, and when you’re ready, click the “Send” button. Outlook will now schedule your email to be sent at the specified time.
Tips for Success:
Double-Check Time Zones: If your recipient is in a different time zone, make sure to consider this when scheduling your email.
Review Before Confirming: Before hitting the “Send” button, review your scheduled email to ensure everything is accurate.
Edit or Reschedule: If you need to make changes, you can always go back to the scheduled email in your “Outbox” and adjust the date and time.


