If you’re a user of Outlook.com, whether through the web, the desktop application, or via its mobile app, the process of adding your unique email signature offers several simple options.
Whether you prefer to personalize your emails with a professional touch or simply want to express your individuality, Outlook provides versatility in creating and inputting your custom email signature.
In this guide, we will delve into the various steps and options available to ensure that your email signature reflects your individual style, professional branding, or any personal touch you wish to convey.
How to Edit Email Signature in Outlook on Windows: A Simple Guide
In Outlook on Windows, customizing your email signature is a simple. A personalized signature adds a professional look to your emails, allowing you to share your contact information or a unique sign-off message effortlessly. Here’s a straightforward guide on how to edit your signature in Outlook:
1. Open Outlook:
- Launch your Outlook application on your Windows computer. Ensure that you are signed in to the account for which you want to edit the signature.
2. Access Email Settings:
- Click on the “File” tab in the upper left corner of the Outlook window. This will open the backstage view. From there, select “Options.”
3. Navigate to Mail:
- In the Outlook Options window, locate and click on the “Mail” category on the left-hand side. This will bring up options related to your email settings.
4. Find Signatures:
- Within the Mail settings, look for the “Signatures…” button under the “Create or modify signatures for messages” section. Click on it to access the Signature settings.
5. Select Email Account:
- If you have multiple email accounts, choose the email account for which you want to edit the signature from the “Email account” drop-down menu. Each account can have its unique signature.
6. Edit Existing Signature or Create a New One:
- In the Email Signature tab, you’ll see a list of existing signatures. Select the one you want to edit, or click on “New” to create a new signature. This is where you can input and format your text.
7. Personalize Your Signature:
- In the editing area, personalize your signature by adding your name, job title, contact details, or any other information you wish to include. Use the formatting toolbar to adjust font styles, sizes, and colors.
8. Add Hyperlinks or Images:
- If you want to include hyperlinks to your social media profiles or a company website, or if you wish to add your company logo, use the options available in the toolbar. Learn how to uninstall apps on window 11
9. Set Default Signatures:
- If you have multiple email accounts, set default signatures for new messages and replies/forwards if desired. This ensures consistency in your email communication.
10. Save Your Changes:
- Once you’re satisfied with your signature, click “OK” to save your changes and close the Signature settings. You can now enjoy your updated, personalized email signature in Outlook.
How to add Email Signature in Outlook.com
Adding a personal touch to your emails is easy in Outlook.com. Follow these simple steps to create and customize your signature, making your messages uniquely yours.
Step 1: Accessing Outlook Settings
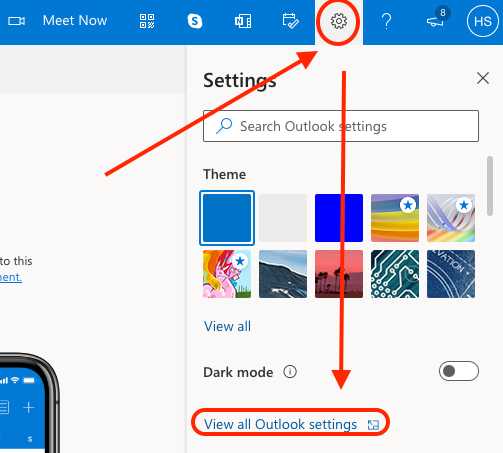
- Begin by clicking on the gear icon located in the top right-hand corner of your Outlook.com interface. A menu will appear—select ‘View all Outlook settings’ to proceed.
Step 2: Navigate to ‘Compose and Reply
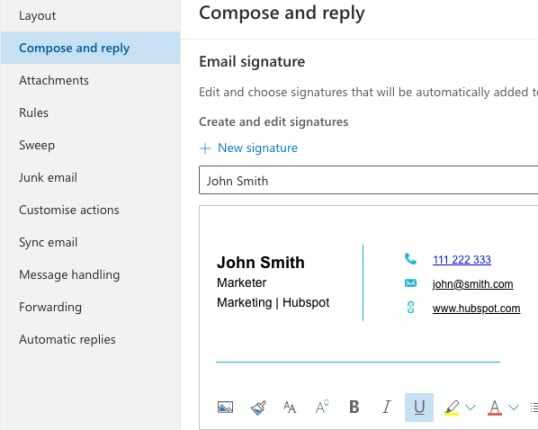
- Once you are in the settings, find and click on ‘Compose and reply.’ This section holds the key to crafting your personalized email signature.
Step 3: Locate the ‘Email Signature’ Section
- Scroll down within the ‘Compose and reply’ settings until you reach the ‘Email signature’ section. This is where the magic happens. Learn how to hide subscribers on YouTube.
Step 4: Create and Format Your Signature
- In this section, you have the freedom to type in your desired signature and format it to suit your preferences. Whether it’s your name, job title, company name, or website, feel free to include the elements that reflect your professional identity. You can even add a touch of personal flair by including an image or logo. However, a word of advice—keep it simple and concise. A cluttered signature might distract your reader, so aim for a balance between personalization and professionalism.
Additional Tips for a Distinctive Signature:
While crafting your signature, consider adding elements that contribute to a clear and professional representation of yourself. These may include:
– Your Full Name
– Job Title
– Company Name
– Website URL
– Contact Information (if appropriate)
– Image or Logo (for a personalized touch)
Remember, the goal is to make your signature informative and visually appealing without overwhelming the reader. A well-thought-out signature enhances the professionalism of your emails, leaving a positive impression on recipients. Experiment with the options available, and you’ll soon have a signature that perfectly complements your communication style in Outlook.com.
How to add image to email signature on Outlook
If you wish to give your email signature a personal touch by adding an image, follow these simple steps. Adding a picture can make your signature stand out and convey more about your professional identity.
Step 1: Accessing Outlook Settings
- Open Outlook on your device and navigate to ‘View all Outlook settings.‘
Step 2: Selecting ‘Compose & Reply’
- In the settings menu, choose ‘Email‘ and then click on ‘Compose & Reply.’ This is where you’ll find the options to customize your email composition.
Step 3: Inserting Pictures Inline
- Look for the ‘Insert Pictures Inline‘ button. Click on it to select an image from your device that you want to incorporate into your signature.
Step 4: Adjusting Size and Position
- Once you’ve chosen the image, you have the flexibility to adjust its size and position according to your preferences. Make sure it complements your overall signature layout.
Step 5: Save Your Changes
- After tweaking the image to your satisfaction, click ‘Save‘ to apply the changes to your signature. Learn how to share calendar on iPhone
Remember: Keeping it Balanced
While adding an image can add a personalized touch to your signature, it’s important to strike a balance. The image should not overpower your signature or distract the recipient. A well-thought-out image, whether it’s a logo or a personal photograph, should enhance rather than overshadow your professional identity.
Tips for an Effective Image Signature:
1. Relevance: Ensure the image is relevant to your professional identity or the content of your emails.
2. Size: Opt for an image size that complements your overall signature without being too large or too small.
3. Positioning: Place the image strategically within your signature to maintain a cohesive and polished look.
4. Consistency: If you’re using an image as part of your signature, consider its consistency with other elements, such as text and contact details.
How to create an email signature on Outlook
Creating a professional and personalized email signature in Outlook adds a touch of individuality to your emails. Here’s a step-by-step guide on how to create your own signature within the Outlook platform:
Step 1: Launch Outlook
- Open the Outlook application on your computer.
Step 2: Access Outlook Settings
- Navigate to the top-right corner and click on the gear icon. From the dropdown menu, select ‘View all Outlook settings.’
Step 3: Choose ‘Email’ Settings
- Within the settings menu, locate and click on ‘Email.’ This will lead you to customization options related to your email account.

Step 4: Find ‘Email Signature’
- Look for the ‘Email signature’ section. This is where you can input and format your signature.
Step 5: Input Your Signature Text
- In the designated box, type in the text you want to include in your signature. This may comprise your name, job title, company name, contact details, or any other information you wish to share.

Step 6: Format Your Signature
- Use the formatting options to customize your signature’s appearance. You can adjust the font, size, color, and style to align with your professional preferences.
Step 7: Add Additional Elements
- Consider incorporating other elements like a company logo or a small image to enhance your signature. Click on the image icon to upload and insert visuals.
Step 8: Adjust the Layout
- Arrange the elements of your signature in a visually pleasing way. You can control the alignment, spacing, and overall layout to achieve a polished look.
Step 9: Preview Your Signature
- Before finalizing, use the preview option to see how your signature will appear in emails.
Step 10: Save Your Signature
- Once satisfied, click ‘Save’ or any equivalent option provided to save your signature settings.
Step 11: Test Your Signature
- Send a test email to yourself or a colleague to ensure your signature appears as intended.
NOTE: Professional Simplicity is Key
While crafting your email signature, maintain a balance between professionalism and simplicity. Include essential information without overcrowding the signature, ensuring it remains clear and easy to read.
How to set up email Signature in Outlook for Desktop: A Step-by-Step Guide
Setting up a signature in the Outlook desktop app on Windows is a straightforward process. Here’s a step-by-step guide that explains how you can effortlessly create and apply your signature:
Step 1: Open Outlook
- Launch the Outlook desktop application on your Windows computer.
Step 2: Navigate to Options
- In the top-left corner, click on the ‘File‘ option. From the dropdown menu, select ‘Options’ and then choose ‘Mail.’
Step 3: Access Signatures
- Within the Mail settings, look for the ‘Composers’ section. Click on ‘Signatures‘ to access the options related to creating and managing your email signature.
Step 4: Copy Your Signature Text
- Prepare your signature text beforehand. You can use a simple text editor to compose and format your signature.
Step 5: Paste into Edit Signature
- In the ‘Signatures’ menu, you’ll find the ‘Edit signature’ box. Paste your pre-prepared signature text into this box.
Step 6: Format and Customize
- Use the formatting options provided to customize your signature. Adjust the font, size, and other elements to achieve the desired look.
Step 7: Preview Your Signature
- Take advantage of the preview option to see how your signature will appear in your emails.
Step 8: Apply and Save
- Once satisfied with the look of your signature, click ‘Apply’ and then ‘Save’ to ensure your settings are stored.
Step 9: Test Your Signature
- Send a test email to yourself or a colleague to confirm that your signature appears correctly in your outgoing messages.
Additional Tips for a Polished Signature:
1. Keep It Simple: Ensure your signature is clear and not overly complex.
2. Include Essential Information: Add key details like your name, job title, and contact information.
3. Use Professional Formatting: Maintain a professional appearance by using appropriate formatting.
4. Consider a Logo or Image: If applicable, include a company logo or a small image for added personalization.

