How to convert HEIC to JPG
- Open the “Settings” app.
- Scroll down and tap on “Camera.”
- Under the “Formats” section, choose “Most Compatible” to save photos in JPG.
NOTE: The above summary is for iPhones
- Open the “Photos” app.
- Select “Photos” from the top menu and then choose “Preferences.”
- In the “General” tab, opt for “Use JPEG instead of HEIC.”
NOTE: The above summary is for Mac
- Use a reliable image converter software or online tool to convert HEIC to JPG.
- Ensure that the chosen tool maintains the desired image quality during conversion.
NOTE: The above summary is for PC
The above steps are just the summary of the steps you need to take in order to convert HEIC to JPG, check the full process below 👇
Commencing from iOS 11, Apple made a significant alteration to the default photo file format on iPhones and iPads. Previously using the widely recognized JPG format, Apple now employs HEIC, a format known for its superior compression capabilities while maintaining a high image quality. This change allows users to store a greater number of images in the same space on their phones or tablets.
If you prefer or require the JPG format, you have the flexibility to switch back to saving files in that format or convert your photos to JPG when necessary. Below are simple steps on how to make this adjustment on your iPhone, Mac, or PC.
How to convert HEIC to JPG on IPhone
If dealing with HEIC files seems like a hassle, there’s a simple solution – set your iPhone to always use the JPG format. This not only eliminates the concerns about compatibility but also ensures a smoother transfer of images. Here’s a step-by-step guide to effortlessly convert HEIC to JPG on your iPhone:
I. Accessing Settings on Your iPhone:
To get started, open the Settings app on your iPhone. This can be easily located on your device’s home screen. By navigating through the settings,
II. Configuring Camera Settings:
Once inside the Settings app, tap on “Photos.” This will lead you to the camera settings, allowing for personalized adjustments based on your preferences.
III. Choosing the Ideal Format:
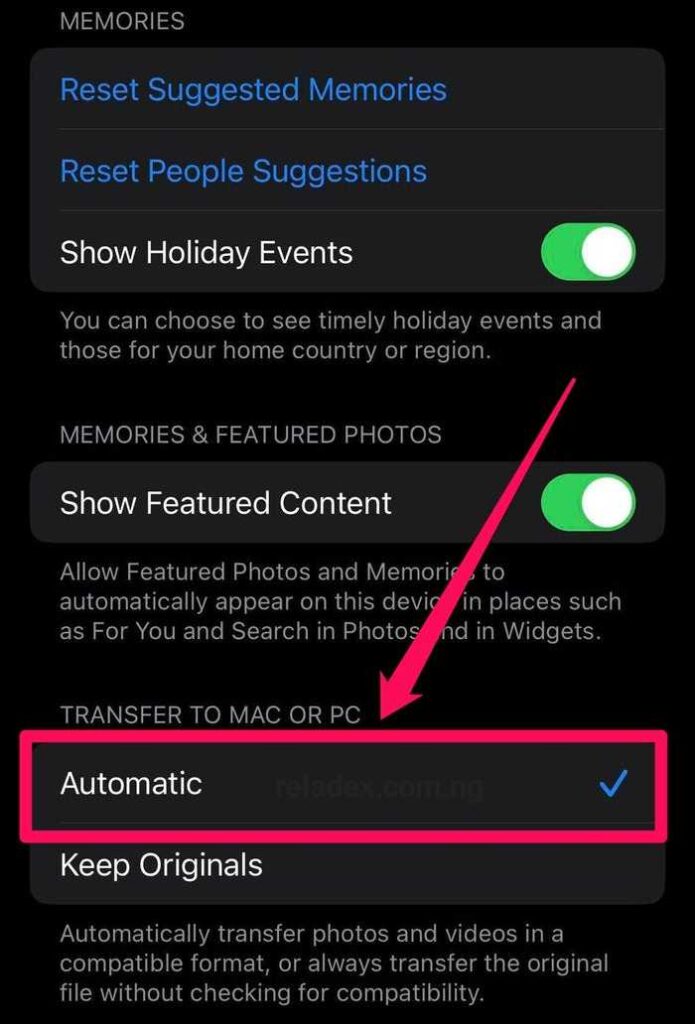
In the “Transfer to Mac or PC” section, select “Automatic.” This step is pivotal in streamlining the transfer process, as it automatically converts images to the universally compatible JPG format. Our goal is to offer users the best of both worlds – space-saving HEIC on the device and hassle-free JPG when transferring to a computer.
IV. Additional Tips:
For users seeking flexibility, consider the “Most Compatible” option under “Formats.” This ensures that your device uses the JPG format, offering a convenient compromise between saving space on your iPhone or iPad with HEIC and ensuring compatibility during transfers.
How to convert HEIC to JPG on Mac
Ensuring compatibility between your iPhone or iPad images and your Mac is essential for a stress-free experience. If your device is set to automatically convert images to JPG upon transfer, great! However, if you find yourself with HEIC photos on your Mac, worry not. This guide will put you through the simple process of converting HEIC to JPG using the Preview app.
Step-by-Step Guide:
- Launch Preview:
- Open the Preview app on your Mac. You can do this by locating it in your applications folder or using the Spotlight search for quick access.
- Select Your HEIC Photo:
- Locate and open the specific HEIC photo you want to convert within the Preview app.
- Navigate to the File Menu:
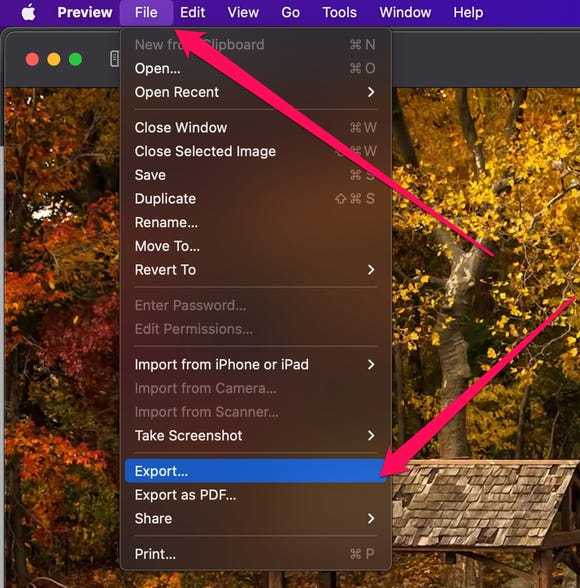
- Once your photo is open in Preview, click on the “File” menu at the top of the screen.
- Choose Export:
- Within the File menu, select “Export.” This action will prompt the application to prepare the photo for conversion.
- Select JPG as the Format:
- In the export options, a Format menu will appear. Click on it and choose “JPG” from the list. This ensures that your HEIC photo is converted to the universally compatible JPG format.
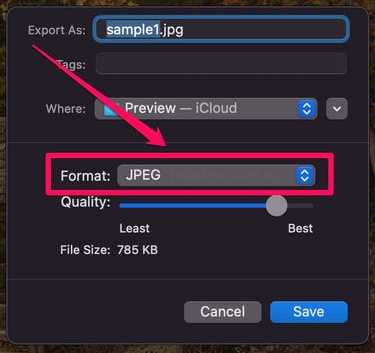
- Save Your Converted Photo:
- Finally, click the “Save” button to complete the conversion process. Your HEIC photo is now transformed into a JPG file, ready for easy sharing and compatibility.

