Understanding how to edit pictures on iPhone can significantly enhance the visual appeal of your images, making them more captivating and standout on social media platforms. Even as a photographer accustomed to utilizing top-notch photo editing software, I am consistently amazed by the exceptional built-in photo editing capabilities of the iPhone’s Photos application. This built-in tool allows for effortless adjustments to fine-tune exposure, highlights, shadows, and color profiles, elevating the quality of my images.
The Photos app editor, while not a substitute for advanced tools like Adobe Lightroom, proves to be an invaluable asset for swiftly adjusting and perfecting snapshots taken with the impressive camera on my iPhone 13 Pro Max. In my perspective, this functionality is a key contributor to making the iPhone one of the best smartphones available, and undoubtedly, the perfect choice for my needs.
If you haven’t explored the Photos editor or have only dabbled in basic features like cropping and auto touch-up, delving into the more intricate sliders may seem a bit overwhelming. Fear not, as we are here to guide you through maximizing the potential of the Photos editor. We’ll break down the theory behind each adjustment, ensuring that, in no time, you’ll be editing your photos like a seasoned professional.
Even if you find yourself dissatisfied with the changes made to an image, rest assured, there is a straightforward way to undo all alterations. Without further ado, let’s delve into the step-by-step process of editing photos on your iPhone.
How to edit pictures on iphone
When it comes to editing photos on your iPhone, the process is not only simple but also offers a myriad of creative possibilities. Follow these steps to edit on iphone and enhance your images with ease.
1. Accessing the Editing Feature:
- Open the Photos app on your iPhone.
- Choose the image you want to edit.
- Tap on the selected image, and then tap on the “Edit” option.
2. Understanding the Editing Interface:
- Upon tapping “Edit,” you’ll enter the image editing application, where we’ll guide you through each essential feature.
- At the bottom of the screen, you’ll find three primary editing panels: Adjust, Filters, and Transform.
- If you’ve captured a photo in Portrait mode, there will be an additional menu for lighting, but for now, let’s focus on the fundamental three editing panels.
3. Adjust Panel:
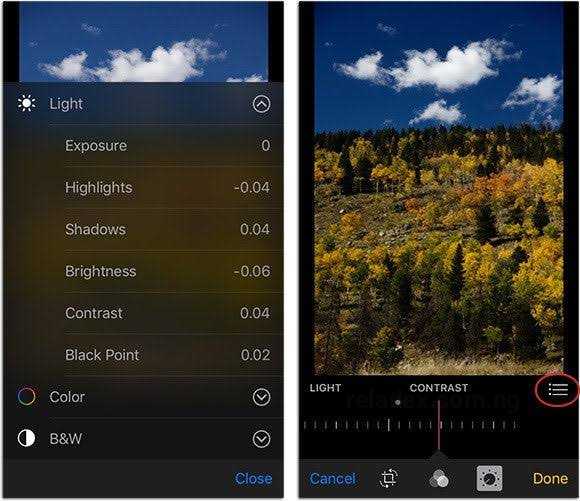
- Identified by the dial icon, the Adjust panel allows you to fine-tune individual attributes of your image. This includes adjusting brightness, contrast, saturation, and more.
- Utilize the slider bar above this panel to scale adjustments, giving you precise control over the intensity of your edits.
4. Filters Panel:
- Represented by three circles, the Filters panel enables you to apply various filters, altering the overall ambiance of your photo. Experiment with different filters to achieve the desired effect.
5. Transform Panel:
The Crop icon signifies the Transform panel, where you can crop, rotate, and flip your images. This panel provides versatile options to enhance the composition of your photo.
6. Slider Bar and Icons:
- Above the editing panels, you’ll find a slider bar resembling a ruler. This bar serves as a tool to adjust the intensity of filters or transformations seamlessly.
- Further options are represented by icons above the slider bar, offering a range of choices for adjustments, filters, or transformations.
In-Depth Guide:
- Now that we’ve covered the basics, let’s delve deeper into each editing panel. Understand how to utilize each feature effectively to bring out the best in your photos.


