Google Search, the ubiquitous tool we all rely on daily, is our gateway to information on the internet. Whether it’s for academic research, shopping, or satisfying curiosity, Google helps us navigate the vast digital landscape. However, its auto-fill feature can sometimes be more of a nuisance than a help, persistently reminding us of past mistakes. With a few simple steps, you can regain control over Google’s memory and and optimize your Google Search experience, Whether you’re using Chrome, Safari, or Firefox, here’s your guide to deleting mistakes and disabling auto-fill suggestions.
Deleting Auto-fill Suggestions in Chrome:
Ever had that frustrating moment when Chrome keeps reminding you of a misspelled web address? Bid farewell to that annoyance with these steps:
- Open Chrome: Click on the Chrome icon to open it.
- Type the Wrong Web Address: Start typing the wrong web address in the search bar.
- Find the Wrong Suggestion: Look for the wrong suggestion that pops up below the search bar.
- Select and Delete: Use the arrow keys on your keyboard to highlight the wrong suggestion. Once highlighted, click the ‘X’ on the right side of the suggestion to delete it.
- Done!: That’s it! The wrong suggestion won’t bother you anymore.
How to Disable Auto-fill Predictions in Chrome:
If you’re tired of Google trying to predict your every search, here’s how to turn off all auto-fill predictions:
- Open Chrome: Click on Chrome to open it, and go to google.com.
- Go to Settings: Look for the three dots in the bottom-right corner and click on them. Then, choose ‘Settings’.
- Change Search Settings: Next, choose ‘Search settings’ from the menu.
- Turn Off Popular Searches: Scroll down until you find ‘Autocomplete with trending searches’ and click ‘Do not show popular searches’.
- Save: Finally, click ‘Saved’ to make sure your changes are saved.


Managing Autofill Memory in Chrome:
Concerned about privacy? Wipe away your old usernames, passwords, addresses, and payment methods from Chrome’s memory:
- Open Chrome: Click on Chrome to open it.
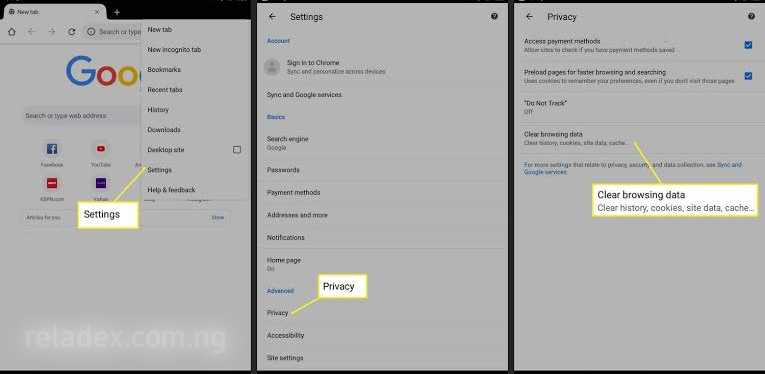
- Go to Settings: Look for the three dots in the top-right corner and click on them. Then, choose ‘Settings’.
- Find Autofill: Look for ‘Autofill’ in the settings menu and click on it.
- Delete Data: You’ll see different types of info you can delete, like usernames, passwords, addresses, and payment methods. Click on the ones you want to delete.
- Confirm: After selecting the info, click on ‘Delete’ to remove it from Chrome.
Resetting Chrome Settings Entirely:
Sometimes, a fresh start is all you need. Here’s how to reset your Chrome settings entirely:
- Open Chrome: Click on Chrome to open it.
- Go to Settings: Look for the three dots in the top-right corner and click on them. Then, choose ‘Settings’.
- Find Reset: Scroll down until you find ‘Reset settings’ and click on it.
- Restore Default Settings: Click on ‘Restore settings to their original defaults’.
- Confirm: Finally, click ‘Reset settings’ to confirm and reset Chrome.
Disabling Auto-fill Search Suggestions in Safari:
Safari users, rejoice! You too can bid adieu to unwanted search predictions:
- Open Safari: Click on Safari to open it.
- Go to Preferences: Look for ‘Preferences’ in the Safari menu and click on it.
- Change Search Settings: Go to the ‘Search’ tab.
- Disable Suggestions: Make sure Google is your default search engine. Then, uncheck the box that says “Include search engine suggestions”.
Disabling Auto-fill Search Predictions in Firefox:
Firefox users, here’s how to take control of your search suggestions:
- Open Firefox: Click on Firefox to open it.
- Go to Preferences: Look for ‘Preferences’ in the Firefox menu and click on it.
- Change Search Settings: Go to the ‘Search’ tab.
- Disable Suggestions: Make sure Google is your default search engine. Then, uncheck the box that says “Provide search suggestions”.
Read also:
- Connect WhatsApp with Facebook page easily.
- Temu Customer Service Number: How to Contact Temu for Help
- Temu Coupon Code, Legitimacy, Safety, and Pricing
- Disabling Pop-Up Blockers Across Devices
How to delete google search history on phone?
Google, one of the most widely used search engines, records our search history to enhance user experience. However, you may have reasons for wanting to clear this history, whether it’s for privacy, security, or simply decluttering. Below is the guide, how to clear search history on google on your phone.

- Step 1: Open Your Web Browser
Begin by opening the web browser. Whether you use Chrome, Safari, Firefox, or any other browser, the process remains similar.
- Step 2: Access Google Account Settings
In the browser’s search bar, type “myactivity.google.com” and press enter. This will take you to your Google Account activity page.
- Step 3: Sign in to Your Google Account
If you’re not already signed in, you’ll be prompted to enter your Google account credentials. This step ensures that you have access to your search history and can delete it securely.
- Step 4: Navigate to Your Activity
Once you’re signed in, you’ll see a list of your recent activity across various Google services. To specifically view your search history, click on “Filter by date & product” at the top of the page.
- Step 5: Select “Search” as the Product
A dropdown menu will appear. From this menu, select “Search” to filter your activity and view only your search history.
- Step 6: Choose the Time Period
Next, select the time period for which you want to delete your search history. You can choose from options like “Today,” “Yesterday,” “Last 7 days,” “Last 30 days,” or “All time.”
- Step 7: View Your Search History
After selecting the time period, you’ll see a list of your search activities within that timeframe. Each entry represents a search query you’ve made while logged into your Google account.
- Step 8: Delete Individual Searches
To delete individual searches, click on the three-dot menu next to each search entry. Then, select “Delete” from the dropdown menu. Confirm the action if prompted.
- Step 9: Clear All Search History
If you want to delete your entire search history for the selected time period, click on the “Delete activity by” option on the left sidebar. Choose the time period again and click “Delete.”
- Step 10: Confirm Deletion
Google will ask you to confirm that you want to delete your search history. Confirm the action, and your search history will be permanently removed from your account.
- Step 11: Repeat if Necessary
If you want to clear search history from multiple time periods, repeat the process for each period until you’ve deleted all the desired data.
- Step 12: Check Your Activity
After completing the deletion process, go back to the main activity page to ensure that your search history has been successfully cleared. You should no longer see the deleted searches in your activity log.

